Harnessing the Power of Kotlin Multiplatform: Combining Native and Shared UIs

Exploring a combined native and shared UI approach for Kotlin Multiplatform

Introduction

Kotlin Multiplatform (KMP) uniquely allows developers to mix native and shared UI components seamlessly, offering unparalleled flexibility in cross-platform development.

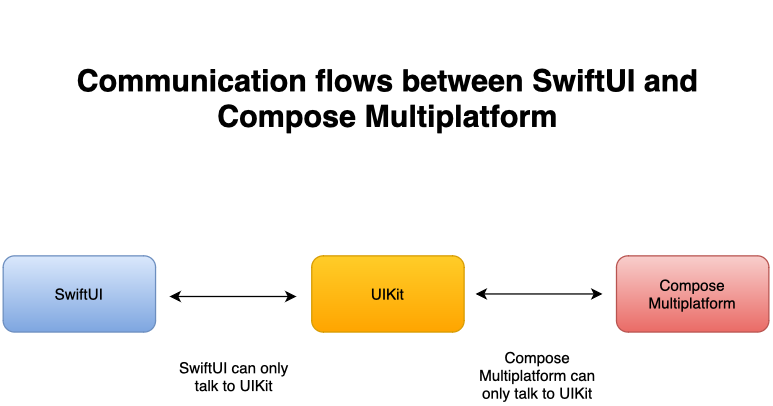
In this article, I present an exciting proof-of-concept demo app for iOS and Android using Kotlin Multiplatform (KMP). This demo showcases the integration of SwiftUI screens with Compose Multiplatform screens shared with Android and, uniquely, a UIKit iOS app shell and navigation.

Recently, I attended a TouchLab Livestream titled ‘Multiplatform Compose + SwiftUI = The Native App Future’, which discussed the Codelab of the same name from KotlinConf2024. Inspired by this, John O’Reilly wrote a blog post Exploring New Worlds of UI sharing possibilities in PeopleInSpace using Compose Multiplatform. He uses a SwiftUI app shell to host a Compose Multiplatform content, hosting native map view using the ‘NativeViewFactory’ technique from the TouchLab Codelab.

I had meant to experiment with a native and shared UI for some time, so this work inspired me. I wanted to explore KMP’s flexibility from a new perspective, using UIKit for iOS navigation, which provides a more mature and feature-rich navigation experience than SwiftUI.

Key Points

  • Flexibility: Easily mix iOS native (UIKit/SwiftUI) and shared (Compose Multiplatform) UI screens. A mix-and-match approach reduces the risks associated with going all-in with a shared UI, with bugs, limitations or abstractions that don’t provide the platform-specific functionality.
  • Interop: Utilise KMP’s strength to blend and play well with native code.
  • Optionality: Showcase the choice between shared and native UI components.

Read on to discover this mixed UI approach’s implementation details and benefits.

Why a UIKit app shell?

One of the slides in the TouchLab livestream showed how both Compose Multiplatform and SwiftUI on iOS use UIKit for interop; this commonality in using UIKit as the common denominator prompted me to investigate using UIKit for the App shell and navigation. I researched this idea but couldn’t find any examples of prior work utilising this idea, so hopefully, this is useful.

I had previously built the MySSE app in Xamarin native for iOS and Android, which combined native screens and shared UI screens via the Xamarin NativeForms feature. This app was in production for five years, and we were very happy with the mixing of native and shared UI. We used UIKit for the navigation between screens on iOS, so I wanted to see how this would work with Kotlin Multiplatform.

When we host Compose Multiplatform in SwiftUI, we create a ComposeUIViewController in Kotlin, which we wrap with a UIViewControllerRepresentable to embed in SwiftUI; see the docs’ Use Compose Multiplatform inside a SwiftUI application’.

To embed SwiftUI views in the Compose Multiplatform view, you can wrap them in UIHostingController and then use them with a UIKit UIViewController. For more information, please refer to the ‘Use SwiftUI inside Compose Multiplatform’ documentation.

To use a SwiftUI view in UIKit, we wrap the view in a UIHostingController.

The docs’ Integration with the UIKit framework’ details how to use Compose Multiplatform inside a UIKit app and how to use UIKit inside Compose Multiplatform.

I found this recent TouchLab article, ‘Jetpack Compose for iOS: Interoping with native Components’ helpful.

Since UIKit is the common denominator, we can host a screen written in UIKit, SwiftUI or Compose Multiplatform.

UIKit Navigation

UIKit navigation is more mature and feature-rich than SwiftUI navigation, which has historically had shortcomings. In iOS 16, the NavigationStack replaces the NavigationView and introduces additional navigation features. It’s a declarative UI, so it might not be suitable for a mixed UI technology stack.

Using a UIKit app shell and navigation means that if we want to use a feature without a SwiftUI control or capability, we can easily incorporate the UIKit ViewContoller. This approach is also well suited for use with existing iOS apps and introducing shared UI screens.

The core of UIKit navigation is the UINavigationController; this acts as a container view controller using stack-based navigation and manages the navigation bar at the top of the screen and, optionally, the toolbar at the bottom of the screen.

Demo App

The Demo App runs on iOS and Android; the Android version has a Home Screen and News Screen written in Compose Multiplatform, which are in the shared module. The corresponding ViewModels are also in the Shared module and use the AndroidX Jetpack ViewModel.

On iOS, the Home screen has three cards: one for displaying the Compose Multiplatform screen, one for a minimal UIKit screen, and lastly, a SwiftUI News Screen.

The app can be found in this GitHub repo.

Code Walkthrough

I created this project using the Kotlin Multiplatform Wizard with the iOS option ‘Do not share UI (use only SwiftUI)’. After getting the SwiftUI and UIKIt navigation to work initially, I used the wizard to create a new Compose Multiplatform project by selecting the iOS option ‘Share UI (with Compose Multiplatform UI framework)’.

I copied the relevant dependencies from the shared build.gradle.kts file and moved the HomeScreen and NewsScreen Compose views from the composeApp to the Shared module so I could use them in the iOS app. If doing this again, starting with a Compose Multiplatform project would be more straightforward. However, I wanted to start with a simple project to get the UIKit and SwiftUI integration working. 

The Shared ViewModels now use the AndroidX lifecycle-ViewModel with KMP support and can be found in the commonMain of the Shared module.
The ViewModels depend on the navigation router, providing functions to navigate to specific screens and override the onCleared function, printing a message so that we can observe the lifecycle is working correctly on iOS.

HomeViewModel:

class HomeViewModel(
    coroutineScope: CoroutineScope,
    private val router: Router,
) : ViewModel(coroutineScope) {

    fun navigateToNews() {
        router.navigate("/screens/news")
    }

    fun navigateToUIKit() {
        router.navigate("/screens/uikit")
    }

    fun navigateToSharedNews() {
        router.navigate("/screens/newsCMP")
    }

    override fun onCleared() {
        super.onCleared()
        println("HomeViewModel onCleared")
    }
}

NewsViewModel:

class NewsViewModel(
    coroutineScope: CoroutineScope,
    private val router: Router,
    private val newsArticleRepository: NewsArticleRepository,
) : ViewModel(coroutineScope) {
    private val _articles = MutableStateFlow<List<Article>>(emptyList())
    val articles: StateFlow<List<Article>> = _articles

    fun fetchNews() {
        viewModelScope.launch {
            newsArticleRepository.getNews().collect {
                _articles.value = it
            }
        }
    }

    fun navigateBack() {
        router.pop()
    }

    override fun onCleared() {
        super.onCleared()
        println("NewsViewModel onCleared")
    }
}

There is a simple shared Repository that uses a Ktor HttpClient to call the ‘News API’. To run the app, you will need to follow the link and get an API key.

@Serializable
data class Article(
    val title: String,
    val description: String,
    val url: String,
    val urlToImage: String
)

@Serializable
data class NewsResponse(
    val articles: List<JsonElement>
)

class NewsArticleRepository(
    private val httpClient: HttpClient,
    private val jsonConfiguration: Json) {

    fun getNews(): Flow<List<Article>> = flow {
        val apiKey = "YourAPIKey"
        
        val response: HttpResponse = httpClient.get("https://newsapi.org/v2/top-headlines") {
            parameter("country", "us")
            parameter("apiKey", apiKey)
        }

        // Deserialize response body into NewsResponse
        val newsResponse = response.body<NewsResponse>()

        // Filter out invalid articles and deserialize valid ones
        val articles = newsResponse.articles.mapNotNull { jsonElement ->
            try {
                val jsonObject = jsonElement.jsonObject
                val title = jsonObject["title"]?.jsonPrimitive?.contentOrNull
                val description = jsonObject["description"]?.jsonPrimitive?.contentOrNull
                val url = jsonObject["url"]?.jsonPrimitive?.contentOrNull
                val urlToImage = jsonObject["urlToImage"]?.jsonPrimitive?.contentOrNull

                if (title != null && description != null && url != null && urlToImage != null) {
                    jsonConfiguration.decodeFromJsonElement<Article>(jsonElement)
                } else {
                    null
                }
            } catch (e: Exception) {
                println("Error parsing JSON: ${e.message}")
                null
            }
        }

        emit(articles)
    }
}

The navigation implementation uses a very simple router to push and pop the views – I wanted to keep the Proof-of-Concept as simple as possible. The interfaces Screen and Router can be seen below:

interface Screen

interface Router {
    fun navigate(uri: String)
    fun pop()
    fun registerRoute(uri: String, screen: Screen)
}

The Android implementations of the Screen and Router interfaces can be found in the Shared modules androidMain:

class AndroidScreen(val composable: @Composable () -> Unit) : Screen

class AndroidRouter(private val navController: NavHostController) : Router {
    private val routes = mutableMapOf<String, @Composable () -> Unit>()

    override fun navigate(uri: String) {
        navController.navigate(uri)
    }

    override fun pop() {
        navController.popBackStack()
    }

    override fun registerRoute(uri: String, screen: Screen) {
        val composable = (screen as? AndroidScreen)?.composable ?: return
        routes[uri] = composable
    }

    @Composable
    fun NavHostContent() {
        NavHost(navController = navController, startDestination = "/screens/home") {
            routes.forEach { (uri, composable) ->
                composable(uri) { composable() }
            }
        }
    }
}

The iOS implementations of the Screen and Router interfaces can be found in the Shared modules iosMain. We can use the UINavigationController from Kotlin code, so if the Router were to be iterated on, it should be easier if both the Android and iOS implementations are written in Kotlin:

class DarwinScreen(val createViewController: () -> UIViewController) : Screen

class DarwinRouter(private val navigationController: UINavigationController) : Router {
    private val routes = mutableMapOf<String, () -> UIViewController>()

    override fun navigate(uri: String) {
        routes[uri]?.let { createViewController ->
            val viewController = createViewController()
            navigationController.pushViewController(viewController, true)
        }
    }

    override fun pop() {
        navigationController.popViewControllerAnimated(true)
    }

    override fun registerRoute(uri: String, screen: Screen) {
        routes[uri] = (screen as? DarwinScreen)?.createViewController ?: { UIViewController() }
    }
}

I’ve used Koin for Dependency Injection (DI), manually creating the DarwinRouter instance in the AppDelegate and passing the UINavigationController. The DarwinRouter instance is passed to the Koin.start () function, which adds it to the Koin module.

@BetaInteropApi
fun Koin.get(objCClass: ObjCClass): Any {
    val kClazz = getOriginalKotlinClass(objCClass)!!
    return get(kClazz, null, null)
}

@BetaInteropApi
fun Koin.get(
    objCClass: ObjCClass,
    qualifier: Qualifier?,
    parameter: Any,
): Any {
    val kClazz = getOriginalKotlinClass(objCClass)!!
    return get(kClazz, qualifier) { parametersOf(parameter) }
}

inline fun <reified T : Any> Module.singleInstance(instance: T) {
    single(createdAtStart = true) { instance } bind T::class
}

inline fun <reified T : Any> Module.factoryInstance(instance: T) {
    factory { instance } bind T::class
}

fun initKoin(router: Router): KoinApplication {
    val iosDependenciesModule = module {
        single { router }
    }
    return KoinInitializer().init(iosDependenciesModule)
}

@Suppress("unused") // Called from Swift
object KotlinDependencies : KoinComponent {
    fun getRouter() = getKoin().get<Router>()
    fun getHomeViewModel() = getKoin().get<HomeViewModel>()
    fun getNewsViewModel() = getKoin().get<NewsViewModel>()
}

actual class KoinInitializer {
    actual fun init(platformSpecific: Module): KoinApplication = startKoin {
        modules(darwinModule + appModule() + platformSpecific)
    }
}

In the iOS App the AppDelegate contains the code to start the app:

@UIApplicationMain
class AppDelegate: UIResponder, UIApplicationDelegate {
    var window: UIWindow?
    var coordinator: MainCoordinator?

    func application(_ application: UIApplication, didFinishLaunchingWithOptions launchOptions: [UIApplication.LaunchOptionsKey: Any]?) -> Bool {
        
        let window = UIWindow(frame: UIScreen.main.bounds)
        self.window = window

        let navigationController = UINavigationController()
        let coordinator = MainCoordinator(navigationController: navigationController)
        self.coordinator = coordinator

        let router = DarwinRouter(navigationController: navigationController)
        Koin.start(router: router)
        
        coordinator.start()

        window.rootViewController = navigationController
        window.makeKeyAndVisible()

        return true
    }
}

We then init Koin passing the instance of the DarwinRouter we created in the AppDelegate:

final class Koin {
    private var core: Koin_coreKoin?

    static let instance = Koin()

    static func start(router: Router) {
        if instance.core == nil {
            let koinApp = KoinDarwinKt.doInitKoin(router: router)
            let koin = koinApp.koin
            
            instance.core = koin
        }
        if instance.core == nil {
            fatalError("Can't initialize Koin.")
        }
    }

    func getScope() -> Koin_coreScope? {
        return core?.scopeRegistry.rootScope
    }

    private init() {}
}

The MainCoordinator configures the different routes for the screens and creates the UIViewControllers, which wrap the SwiftUI and Compose Multiplatform screens.

Note that this does not strictly conform to the use of Coordinators in SwiftUI, which would usually provide functions to navigate to the different screens. This is done by the ViewModels in this example app.

protocol Coordinator: AnyObject {
    var navigationController: UINavigationController { get set }

    func start()
}

class MainCoordinator: NSObject, Coordinator, ObservableObject {
    var navigationController: UINavigationController

    init(navigationController: UINavigationController) {
        self.navigationController = navigationController
        super.init()
    }

    func start() {
        let router = KotlinDependencies.shared.getRouter()
        setupRoutes(router: router)
        router.navigate(uri: "/screens/home")
    }

    private func setupRoutes(router: Router) {
        router.registerRoute(uri: "/screens/home", screen: DarwinScreen {
            let homeView = HomeView(holder: NavStackHolder())
            let hostingController = ViewModelHostingController<HomeView, HomeViewModel>(rootView: homeView)
            hostingController.navigationItem.title = "Home"
            
            return hostingController
        })
        
        router.registerRoute(uri: "/screens/news", screen: DarwinScreen {
            let newsView = NewsView(holder: NavStackHolder())
            let hostingController = ViewModelHostingController<NewsView, NewsViewModel>(rootView: newsView)
            hostingController.navigationItem.title = "News"
            return hostingController
        })
        
        router.registerRoute(uri: "/screens/newsCMP", screen: DarwinScreen {
            let newsComposeViewController = NewsViewControllerKt.NewsViewController(router: router)
            newsComposeViewController.navigationItem.title = "News CMP"
            return newsComposeViewController
        })
        
        router.registerRoute(uri: "/screens/uikit", screen: DarwinScreen {
            UIKitViewController(router: router)
        })
    }
}

To use the Compose Multiplatform News Screen in the iOS app, we use the function NewsViewController, which returns a ComposeUIViewController. This is standard Compose Multiplatform stuff, with just the addition of the SafeArea composable, which adjusts the view to account for the safe area and navigation bar.

fun NewsViewController(router: Router) = ComposeUIViewController {
    SafeArea {
        NewsScreen()
    }
}

@OptIn(ExperimentalForeignApi::class)
@Composable
fun SafeArea(content: @Composable () -> Unit) {
    val window = UIApplication.sharedApplication.keyWindow
    val density = LocalDensity.current

    // Remember the safe area insets and navigation bar height
    val (topPadding, bottomPadding) = remember(window) {
        val insets = window?.safeAreaInsets
        val navBarHeight = getNavigationBarHeight(window?.rootViewController)
        val topPadding = insets?.useContents { top + navBarHeight } ?: 0.0
        val bottomPadding = insets?.useContents { bottom } ?: 0.0
        Pair(topPadding, bottomPadding)
    }

    Box(modifier = Modifier.padding(top = with(density) { topPadding.toFloat().dp }, bottom = with(density) { bottomPadding.toFloat().dp })) {
        content()
    }
}

@OptIn(ExperimentalForeignApi::class)
fun getNavigationBarHeight(viewController: UIViewController?): Double {
    var uiViewController = viewController
    var height = 0.0
    while (uiViewController != null) {
        if (uiViewController is UINavigationController) {
            uiViewController.navigationBar.frame.useContents {
                height = size.height
            }
        }
        uiViewController = uiViewController.presentedViewController
    }
    return height
}

The SwiftUI views are wrapped by the ViewModelHostingController, which derives from UIHostingController.

This implements the ViewModelStoreOwner interface and uses the ViewModelStore while hooking into the UIKit lifecycle to ensure that the ViewModels are cleared. when we run the app, we can see the ‘onCleared’ message printed when we navigate back from the News Screen for both SwiftUI and Compose Multiplatform versions of the screen. The Compose Multiplatform lifecycle is handled automatically for us which is excellent!

@OptIn(ExperimentalForeignApi::class)
@Composable
fun SafeArea(content: @Composable () -> Unit) {
    val window = UIApplication.sharedApplication.keyWindow
    val density = LocalDensity.current

    // Remember the safe area insets and navigation bar height
    val (topPadding, bottomPadding) = remember(window) {
        val insets = window?.safeAreaInsets
        val navBarHeight = getNavigationBarHeight(window?.rootViewController)
        val topPadding = insets?.useContents { top + navBarHeight } ?: 0.0
        val bottomPadding = insets?.useContents { bottom } ?: 0.0
        Pair(topPadding, bottomPadding)
    }

    Box(modifier = Modifier.padding(top = with(density) { topPadding.toFloat().dp }, bottom = with(density) { bottomPadding.toFloat().dp })) {
        content()
    }
}

@OptIn(ExperimentalForeignApi::class)
fun getNavigationBarHeight(viewController: UIViewController?): Double {
    var uiViewController = viewController
    var height = 0.0
    while (uiViewController != null) {
        if (uiViewController is UINavigationController) {
            uiViewController.navigationBar.frame.useContents {
                height = size.height
            }
        }
        uiViewController = uiViewController.presentedViewController
    }
    return height
}

The ViewModel is resolved using the KoinViewModelProvider. This uses the KoinViewModelFactory and can be found in the Shared modules iosMain:

class KoinViewModelProvider : KoinComponent {

    @OptIn(KoinInternalApi::class)
    fun <T : ViewModel> resolveViewModel(
        vmClass: KClass<T>,
        viewModelStore: ViewModelStore,
        key: String? = null,
        extras: CreationExtras = CreationExtras.Empty,
        qualifier: Qualifier? = null,
        parameters: ParametersDefinition? = null,
    ): T {
        val koin = getKoin()
        val factory = KoinViewModelFactory(vmClass, koin.scopeRegistry.rootScope, qualifier, parameters)
        val provider = ViewModelProvider.create(viewModelStore, factory, extras)
        
        return when {
            key != null -> provider[key, vmClass]
            else -> provider[vmClass]
        }
    }
}

object ViewModelResolver : KoinComponent {
    fun <T : ViewModel> resolveViewModel(
        vmClass: KClass<T>,
        viewModelStore: ViewModelStore,
        key: String? = null
    ): T {
        val koinViewModelProvider = KoinViewModelProvider()

        return koinViewModelProvider.resolveViewModel(vmClass, viewModelStore, key)
    }
}

object KClassProvider {
    @OptIn(ExperimentalStdlibApi::class)
    fun getKClass(objCClass:ObjCClass): KClass<*> {
        val kClazz = getOriginalKotlinClass(objCClass)
        return kClazz ?: error("Could not find Kotlin class for ObjCClass: $objCClass")
    }
}

I used the ViewControllable protocol outlined in the article ‘SwiftUI View, UIKit Navigation’.  This lets the SwiftUI views use the UIViewController to navigate and also provides lifecycle functions like loadView and viewOnAppear.

Whilst these are not really used in the Demo App, I have left them in as this was part of my journey, and they demonstrate some additional flexibility around integrating SwiftUI Views with UIKit. The downside is some additional complexity around the use of the ViewModel via a computed property.

public class NavStackHolder {
    public weak var viewController: UIViewController?
    
    public init() {}
}

protocol ViewControllable: View {
    associatedtype VM: ObservableObject
    var viewModel: VM? { get set }
    var holder: NavStackHolder { get set }
    
    func loadView()
    func viewOnAppear(viewController: UIViewController)
}

extension ViewControllable {
    var observedViewModel: VM? {
        get { viewModel }
        set { viewModel = newValue }
    }
}

The Home screen in SwiftUI directly uses the shared ViewModel with an extension to conform to the Combine frameworks ObservableObject:

struct HomeView: ViewControllable {
    // Use a property without the wrapper for protocol conformance
    var viewModel: HomeViewModel?
    var holder = NavStackHolder()

    // Computed property to provide @ObservedObject
    var observedViewModel: HomeViewModel? {
        get { viewModel }
        set { viewModel = newValue }
    }

    var body: some View {
        ScrollView {
            VStack(alignment: .leading, spacing: 20) {
                SectionView(
                    title: "SwiftUI News Screen",
                    subtitle: "Explore the latest news",
                    description: "View the most recent news articles and updates in this section.",
                    buttonText: "Go to News Screen",
                    buttonAction: { observedViewModel?.navigateToNews() }
                )
                SectionView(
                    title: "UIKit Screen",
                    subtitle: "UIKit Integration",
                    description: "Experience the seamless integration with UIKit.",
                    buttonText: "Goto UIKit",
                    buttonAction: { observedViewModel?.navigateToUIKit() }
                )
                SectionView(
                    title: "Compose News Screen",
                    subtitle: "Explore the latest news",
                    description: "Check out the Compose Multiplatform version of the News screen.",
                    buttonText: "Go to News CMP",
                    buttonAction: { observedViewModel?.navigateToSharedNews() }
                )
            }
            .padding()
        }
        .frame(maxWidth: .infinity, maxHeight: .infinity)
        .background(Color.white)
    }

    func loadView() {
        // Additional setup if needed
    }

    func viewOnAppear(viewController: UIViewController) {
        // Additional actions when the view appears
    }
}

struct SectionView: View {
    var title: String
    var subtitle: String
    var description: String
    var buttonText: String
    var buttonAction: () -> Void

    var body: some View {
        VStack(alignment: .leading, spacing: 10) {
            Text(title)
                .font(.title)
                .padding(.bottom, 2)
            Text(subtitle)
                .font(.headline)
                .foregroundColor(.gray)
            Text(description)
                .font(.body)
                .foregroundColor(.black)
                .padding(.bottom, 10)
            Button(action: buttonAction) {
                Text(buttonText)
                    .padding()
                    .frame(maxWidth: .infinity)
                    .background(Color.blue)
                    .foregroundColor(.white)
                    .cornerRadius(10)
            }
        }
        .padding()
        .background(Color(UIColor.systemGray6))
        .cornerRadius(15)
    }
}

extension ViewModel: ObservableObject {
    public var objectWillChange: ObservableObjectPublisher {
        return ObservableObjectPublisher()
    }
}

The News Screen in SwiftUI uses TouchLab’s SKIE to consume Flows. Using the ‘Flows in SwiftUI (Preview)’ meant we didn’t need wrappers around the shared ViewModel, which is a nice improvement.

struct NewsView: ViewControllable {
    // Use a property without the wrapper for protocol conformance
    var viewModel: NewsViewModel?
    var holder = NavStackHolder()

    // Computed property to provide @ObservedObject
    var observedViewModel: NewsViewModel? {
        get { viewModel }
        set { viewModel = newValue }
    }

    var body: some View {
        NavigationView {

            Observing(observedViewModel!.articles) { articles  in
                List(articles, id: \.self) { article in
                    NewsListItem(article: article)
            }
            .listStyle(PlainListStyle())
        }
        }
        .onAppear {
            observedViewModel?.fetchNews()
        }
    }

    func loadView() {
        // Additional setup if needed
    }

    func viewOnAppear(viewController: UIViewController) {
        // Additional actions when the view appears
    }
}

struct NewsListItem: View {
    let article: Article

    var body: some View {
        HStack {
            if let imageUrl = URL(string: article.urlToImage) {
                KFImage(imageUrl)
                    .resizable()
                    .scaledToFill()
                    .frame(width: 80, height: 80)
                    .clipShape(RoundedRectangle(cornerRadius: 10))
                    .padding(.trailing, 8)
            }

            VStack(alignment: .leading) {
                Text(article.title)
                    .font(.headline)
                
                Text(article.description_)
                    .font(.subheadline)
                    .foregroundColor(.secondary)
            }
        }
        .onAppear(){
            print("title: " + article.title)
            print("description: " + article.description)
        }
        .padding(8)
        .background(RoundedRectangle(cornerRadius: 10).fill(Color.white).shadow(radius: 2))
    }
}

Key Takeaways

This experiment demonstrates an exciting approach: using a UIKit app shell to host SwiftUI, UIKit, or Compose Multiplatform screens. Given that communication between these platforms occurs via UIKit, this is a solid approach. The navigation capabilities of this proof-of-concept are intentionally limited and would need further work to use in a real-world app.

One significant detail was wiring up the AndroidX Jetpack ViewModel lifecycle to the hosting UIViewController, preventing it from leaking into each SwiftUI Views and ViewModel pair. In my article ‘Getting Started with Jetpack ViewModels and DataStore in Kotlin Multiplatform,’ I demonstrated how we could implement a ViewModelStoreOwner to hook into the lifecycle and dispose of the ViewModel properly. However, this required additional code in each SwiftUI View and ViewModel, which developers could easily forget.

A Compose Multiplatform app shell is the easiest and default option for KMP developers who wish to share UI. Sharing SwiftUI views embedded in Compose Multiplatform screens is a fantastic technology, and I’m confident it will be beneficial, but this will appeal to Android rather than iOS developers.

Using a UIKit or SwiftUI app shell with entire screens written in SwiftUI (or UIKit) and others with a shared Compose Multiplatform UI is much more likely to appeal to iOS developers. This approach provides a clear boundary at the screen level; this style will also work well with existing native iOS apps into which you wish to bring shared Compose Multiplatform screens.

The more we can give iOS developers an app structure that uses the technologies they are familiar with and some shared components and UI in compose Multiplatform and KMP, the more likely they will engage with the project.

A recent poll by John O’Reilly on X showed that 61% of respondents prefer using Compose Multiplatform for everything. The articles and apps created and shared by the community confirm this trend, although it is not an exhaustive survey.

In essence, writing a Compose Multiplatform app is like writing a native Android app that runs on iOS, so it is Android-first. At the same time, an iOS developer could say, well, let’s use Skip.tools and do the same thing in reverse: write an iOS app in SwiftUI, which runs on Android, so iOS-First!

Hopefully, we can find a compromise with an approach like the one demonstrated in this article and still facilitate the mixing of native and shared UI.

As an aside, an interesting article on using Skip with KMP, ‘Skip and Kotlin Multiplatform’, shows how we can combine the two technologies.

Summary

The flexibility of Kotlin Multiplatform (KMP) is fantastic! We can build screens using SwiftUI, Compose Multiplatform, or UIKit and mix these technologies within the same screen. There is something for everyone; we can adopt an Android-first approach with Compose Multiplatform or use an UIKit/SwiftUI app shell to have more parity between the two platforms.

As a community, I think for KMP to realise its potential, we have to bring along the iOS developers and make it, if not appealing, at least palatable to them; going full Compose Multiplatform, as it’s the easiest/default option, misses out on the brilliance of the optionality of sharing UI that is the superpower of KMP!

If you are interested in discussing how we could help with KMP development, you can reach me, Richard Woollcott, at [email protected]

Resources